Using Tables
NMRViewJ presents a lot of information in the form of tables. Peaks, atom assignments, open datasets and more can all be presented with a table widget. The table widget can also be used by other NMRViewJ developers and users to present their own information and to otherwise customize the program. Fundamentally the table widget is used like any other Swank/Tk widget (menus, buttons, entries, lists etc.). New tables are created with "jtable widgetName". Because it can be used in a more complicated ways, however, it is generally used through a specialized library of Tcl procedures.
This chapter will demonstrate how to create and interact with tables within NMRViewJ. We'll focus on using the table Tcl commands that wrap up the low level jtable commands. Developers who want to dig deeper into the code should look at the script "table.tcl" in the nvtclJ directory.
When using the library of table commands one creates a new command for
each table. That new command is then used to create and interact with
the actual table widget. For example, the we can create a test example
with the following command: ::table::table testTbl After executing this command a new command, named
testTbl, exists. In the following discussion we'll use this example
command. If the command testTbl already exists you will get an error
message indicating that fact. Once you have the table command you can
proceed to creating an actual table. The table command will have a whole
series of subcommands you can use. For example, the simplest way to
create a new toplevel window containing a table is:
testTbl createtl .tbl "A B C" In this example, we'll get a new
toplevel window named .tbl that contains a table with three columns
named A, B and C. Because tables can often contain many rows and columns
it's a good idea to have them placed inside a jscrollpane widget, that
will automatically provide scrollbars for scrolling through all the
table. The "createtl" subcommand will create a jscrollpane, pack it into
the new toplevel window, and add the new table widget to the
jscrollpane.
If you want to have more control over where your new table is placed,
create the toplevel window and jscrollpane yourself. You're now free, of
course, to place the jscrollpane anywhere in the toplevel widget and
pack in any other widgets along with it. To create and add the table
widget to an existing scrollpane use a command like testTbl create .tl.tbl .tl.spane "A B C". This will create a new table
widget named .tl.tbl and add it to an existing scrollpane named
.tl.spane
Having created a table we now need to add data to it. We can do that in several different ways. One way is to add data a line at a time, and have the table automatically grow to accommodate it. The addline subcommand will add one line of data to the table and takes two arguments. The first argument specifies the position to add the data at and is normally specified as -1 to signify that the data should be added at the end of the existing data. The second argument, is a set of values to be added to the table. There should be one element in the set for each column in the table. Because this set of values may come from an external file or source where the fields may be separated in different ways you can specify the field separator prior to using the "addline" subcommand. The field separator can be a space character, a comma or a tab and is specified with the "pattern" subcommand. A complete example, of creating and populating a table follows.
            ::table::table testTbl
            testTbl createtl .tbl "Peak Label Intensity"
            testTbl pattern ","
            testTbl addline -1 "1,3.HN,8.3"
            testTbl addline -1 "2,4.HN,7.5"
            testTbl addline -1 "3,5.HN,9.7"
            testTbl addline -1 "4,6.HN,4.3"
We can also load data from an existing file using the "load" subcommand. In order to allow greater flexibility the load subcommand takes, as an argument, a handle to an already opened file, rather than the name of a file to read. This allows us to actual read not just from traditional files but from a connections to data sources like web servers.
The following script will prompt us for a file to open and then create a table and read the file and load it into the table. With no options besides the file handle the load subcommand parses the file assuming the fields on each line are separated with white space (one or more space characters). The optional second argument specifies the field separator character to use, and is one of the four words: "auto", "tab", "csv" or "space". If the argument is "auto", as in this example it will look at the first row of the file and attempt to determine the correct separator to use. If a tab character is found it will assume tab separation. If there is no tab character, but a comma is found it will assume the file has comma separated values (csv). Finally, if neither is found it will assume space separated values. Note that, whereas we must open a file or connection and pass the handle as an argument to the load subcommand we don't explicitly close the file or connection. This is done automatically after the date has been loaded.
        proc loadTable {} {
            set fileName [tk_getOpenFile]
            if {$fileName == {}} {return}
            set f1 [open $fileName]
            ::table::table sampleFileTbl
            sampleFileTbl createtl .sampleFileTbl ""
            sampleFileTbl load $f1 auto
        }
Following is the contents of a file that would create the table shown in the figure. The first line of the file should specify the names of the columns that will be created in the table.
        Atom Label RMS
        0    3.HN   0.4
        1    4.HN   0.3
        2    5.HN   0.7
        3    6.HN   0.2
        4    7.HN   0.9
        5    8.HN   0.8
        6    9.HN   0.7
        7    10.HN   0.4
We can also set the content of tables more explicitly. The number of
columns and their names can be set with the headers subcommand (
testTbl headers headerList ). Then we can set the number of rows with
the "rows" subcommand ( testTbl rows nRows ) and fill in the values with the "set" subcommand (
testTbl set row column value ). You can also add a column to an existing
column with testTbl addcolumn newColumnName. An example of explicitly setting
the row and column values in a table would be:
            ::table::table testTbl
            testTbl createtl .tbl "Structure RMS"
            set nRows 5
            testTbl rows $nRows
            for {set iRow 0} {$iRow < $nRows} {incr iRow} {
                testTbl set $iRow 0 $iRow
                testTbl set $iRow 1 [expr {rand()+1.0}]
            }
            testTbl update data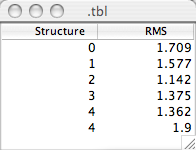
Setting values in tables doesn't always result in the tables display being refreshed. That's why in the above example we follow the setting commands with a call to the update subcommand. The "data" argument in this command indicates that only the data in the table has been changed, and not the whole structure (number of rows and columns etc.).
The get subcommand is complementary to the set subcommand and has the
obvious result of returning the data value at the specified row and
column ( testTbl get row column. Similarly, the "rows", "cols" and "headers" command,
specified without any arguments will return the number of rows, the
number of columns and the names of the columns, respectively.
Sometimes you'll want to get all the values in a row or a column of the table and this can be done as follows:
                set rowValues [testTbl getrow 0]
                set columnValues [testTbl getcol 0]
The unique values in a give column can be returned with
set uniqueValues [testTbl values 0] and the number of unique values with
set nValues [testTbl nvalues]Having created a table and populated it with values, we might want to save it to a text file. This can be done with the "save" subcommand. This subcommand has one required argument, the name of the file, and one optional argument, the field separator to use. The default separator is the tab character. To specify a different character (or string of characters) give this explicitly as an option. So to save a file to test.txt with a space character separating fields use
testTbl save test.txt " "If for some reason you want to save a file with a series of dashes as the separator use:
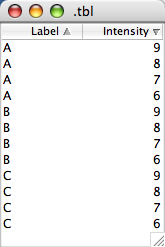
testTbl save test.txt "----"Tables can be sorted by clicking with the left mouse button on the column header. Clicking the same column header a second time will invert the order of the sort, and clicking a third time will cancel any sorting. You can specify secondary sortings by holding down the Control key when you click. Sorted columns are indicated with a triangle on the header that will point in the sorted direction (increasing or decreasing). If you specify secondarily sorted columns they will be indicated with smaller triangles, decreasing in size in the order they were specified. The following example script will generate a table which is then sorted first on the Label column and secondarily on the Intensity column and displayed in the next figure.
            ::table::table testTbl
            testTbl createtl .tbl "Label Intensity"
            testTbl pattern ","
            set lines {"C,9" "B,7" "A,9" "B,9" "C,7" "A,8"
                       "B,6" "B,8" "C,8" "A,7" "C,6" "A,6"
            }
            foreach line $lines {
                testTbl addline -1 $line
            }
If a table has been sorted you should be careful about reading and writing values from the table. Does a row argument to the "get" or "set" subcommands specify the row in its sorted or presorted position? One way to think about this is to realize that tables are all implemented with an underlying data model that is never sorted. What you see displayed is a sorted representation of that data model. The "get" and "set" commands refer to the row position as you see it in the displayed table so "testTbl get 0 0" will get the first value in the table as it is displayed and thus may get a different value depending on how the table has been sorted. There are corresponding "mget" and "mset" commands which always operate directly on the data model and thereby get or set the same position in the model no matter how the displayed table is sorted. The "getrow" and "getcol" commands always operate on the displayed table, so the values they return will depend on how the table is sorted. At present there are no corresponding "sort independent" versions of these commands.
The columns of a table can be reordered, by pressing and dragging the mouse on a column header. Reordering the columns in this way does not effect the values set or returned by the above commands. Pressing the mouse button on the header and dragging it to a new position will resize the column.
One or more rows in the table can be selected, either by clicking on the rows with the mouse, or programmatically with the "selectRow" subcommand. Pay close attention here as this is unfortunately confusing. The "selectRow" command selects a row based on its position in the unsorted model. So, for example, if you do "testTbl selectRow 0" on a sorted table the row that appears selected may not be the top one in the table. The row that is selected will be the one whose values correspond to the first one in the table model. Here's the confusing part, the "selected" command, which returns a list of selected columns returns rows that are in their sorted positions. So, on an unsorted table, "testTbl selectRow 0" will select the top most displayed row, and "testTbl selected" would then return 0. But if the table was sorted, so the table model values for the first row are displayed in the fourth row (row 0), that fourth row would be displayed as selected and "testTbl selected" would return "4".
You can move back and forth between row values in the two
representations with the "rowforindex" and "indexforrow" subcommands.
The "rowforindex" command will return the table model row that
corresponds to the displayed row that is specified. So in the above
example testTbl rowforindex 4 would return "0". The "indexforrow" does
the opposite, returning the displayed row position for the specified
model row. So testTbl indexforrow 0 would return "4". If you're going to be
working with these commands and sorted tables it is a good idea to do
some experimentation till your comfortable with this.
The data stored in a table model is normally stored in a type specific, optimized manner, so integer values are stored in a Java class that can store integers, doubles in a doubles class, and strings of characters in a String class. If you create a table with the load or addlines command the code will attempt to put the data in the most specific column type. So first, it will look to see if the values is an integer, if not it will test it as a double, and finally if neither store it as a string of characters. You can see what type of values are in a column with the "type" subcommand.
You can set up various bindings on tables. The binding most unique to the table is a binding that fires when the selection changes in the table.
                  proc tableChanged {tbl} {
                      puts [$tbl selected]
                  }
                  set tblWidget [testTbl widget]
                  bind $tblWidget <<SelectionChanged>> {tableChanged testTbl}
There are many more subcommands available, but the ones discussed above should get you going with some sophisticated uses of tables. Also remember that you can use these commands to interact with the predefined tables of NMRViewJ, such as the relaxation table (use the "rateTbl") command, or the titration table (use the "titrationTbl" command).